Authentic Egyptian Koshari Recipe (Easy Homemade Street Food Classic)
Egyptian koshari is the ultimate comfort food and one of the most popular street foods in Egypt. This hearty, budget-friendly dish combines layers of fluffy rice with vermicelli, lentils, pasta, and chickpeas, all topped with a rich, garlic-tangy tomato sauce and crispy fried onions. It’s naturally vegan, incredibly filling, and packed with bold Middle Eastern flavors. In this easy homemade authentic Egyptian koshari recipe, you’ll learn how to perfectly cook each layer and assemble the dish just like it’s served in Egyptian restaurants. Whether you’ve never tried koshari before or already love it, this recipe will become your favorite. I will share all the tips and secrets used by one of the most famous restaurants in Cairo, Egypt. I guarantee you this koshari will taste just like street food koshari.
SHOP OUR ONLINE STORE FOR OLIVE OIL, MEDITERRANEAN SPICES AND MUCH MORE.

Egyptian Koshari
Ingredients
Method
- Season the onions with salt.
- In a large pot, heat the oil over medium heat.
- Fry sliced onions in the hot oil until deep golden and crispy.
- Remove the onions with a spider strainer and place them in a single layer on paper towels to absorb any extra oil.
- Reserve the oil.
- Heat oil in a medium pot and toss in the garlic; sauté just until it becomes golden and fragrant.
- Stir in the diced tomatoes, tomato sauce, and your blend of spices (salt, white pepper, bay leaves, coriander, cumin, nutmeg, cardamom), then lower the heat.
- Allow the sauce to simmer gently for about 10 minutes to let the flavors fully develop.
- Simply combine the ingredients in a small bowl and whisk until well-blended
- Set this aside to allow the sharp flavors to meld while you finish the rest of the components.
- In a small pot, add 4 tbsp of the tomato sauce we just made, 4 tbsp of the garlic & vinegar sauce, and 4 tbsp of the crushed red pepper flakes.
- Simmer for 10 minutes. If it is too thick, you can add a little bit of water.
- Using a medium pot, warm up 2 tablespoons of that flavorful onion-infused oil you set aside earlier.
- Toss in the vermicelli and toast it, stirring constantly, until it reaches a deep, golden-brown hue.
- Stir in the rice for about 2 minutes to coat the grains, then pour in the boiling water and season with salt and pepper.
- Once it reaches a boil, reduce the heat to low, cover, and let it steam for 20 minutes until the rice is perfectly light and fluffy.
- Using a medium pot, warm up 2 tablespoons of that flavorful onion-infused oil you set aside earlier.
- Add the lentils and keep stirring on medium heat for 1 minute.
- Pour in the boiling water, and add salt and ground cumin. Give the lentils a quick toss to ensure they are evenly seasoned with the cumin.
- Boil for 20 minutes until tender.
- Drain and set aside.
- Bring a large pot filled with 6 cups of water to a rolling boil and season generously with salt.
- Slide in the ditalini and broken angel hair pasta, cooking just until they reach a firm, al dente bite.
- Once drained, return the pasta to the pot and toss it with 3 tablespoons of your reserved onion-infused oil.
- Mix thoroughly to ensure the pasta is well-coated and fragrant, then set aside for assembly.
- Place the chickpeas in a small saucepan and cover them with boiling water.
- Stir in a pinch of salt and a dash of ground cumin to infuse them with extra flavor.
- Let the chickpeas simmer gently for about 5 minutes until they are heated through.
- Once finished, drain the water and set the seasoned chickpeas aside for the final assembly.
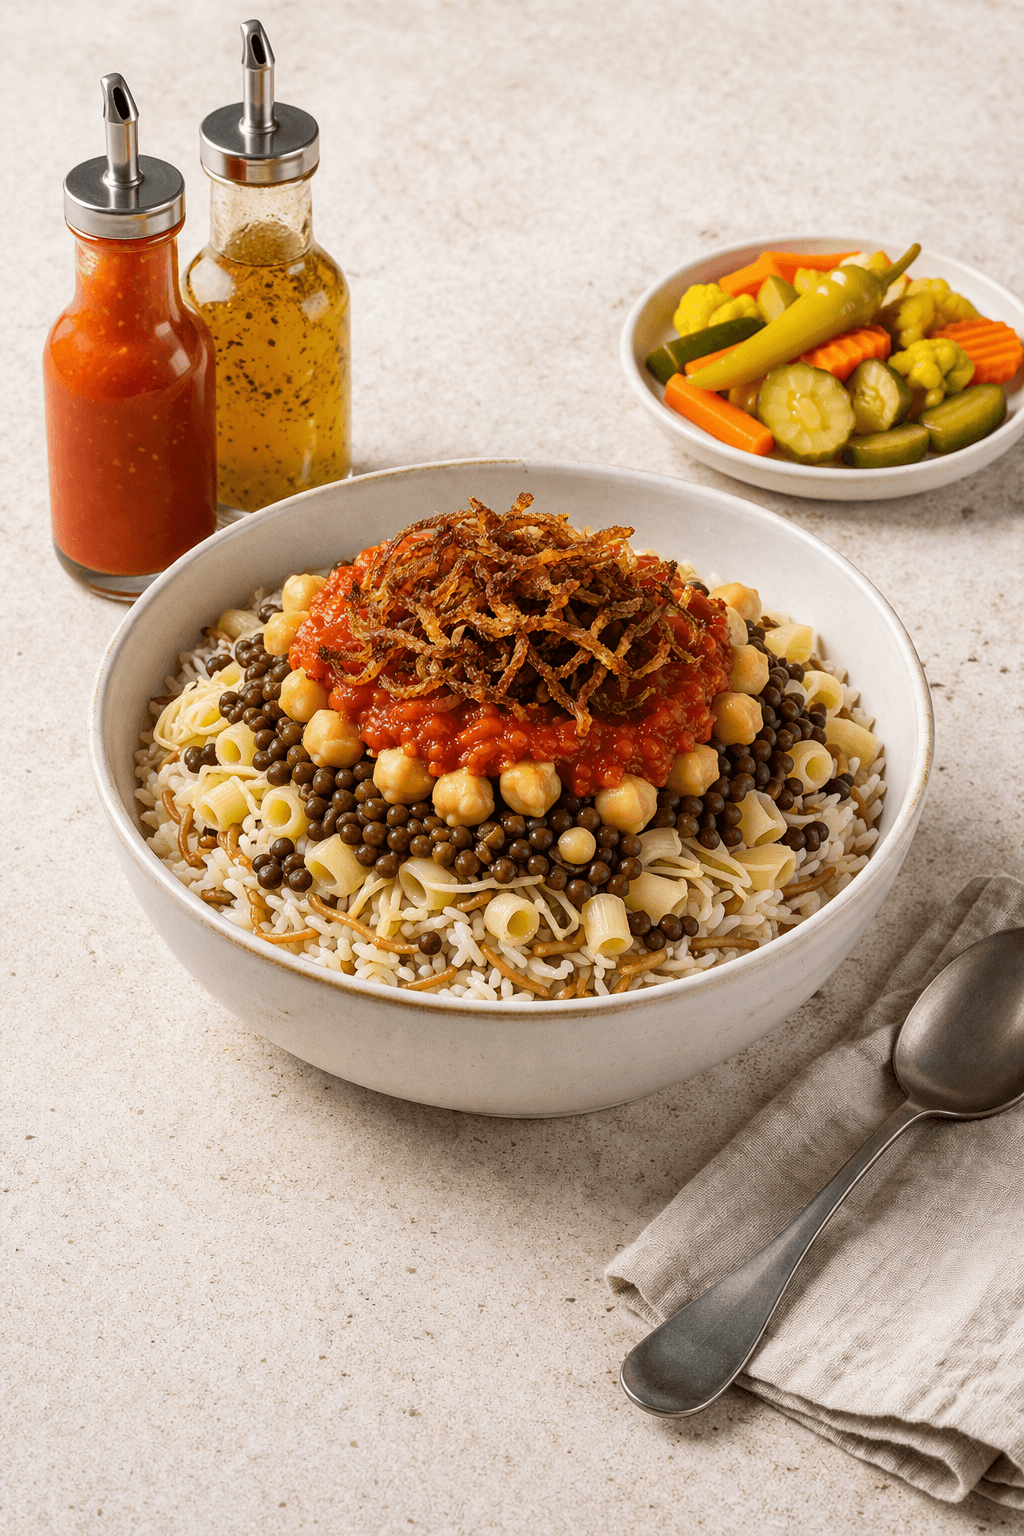
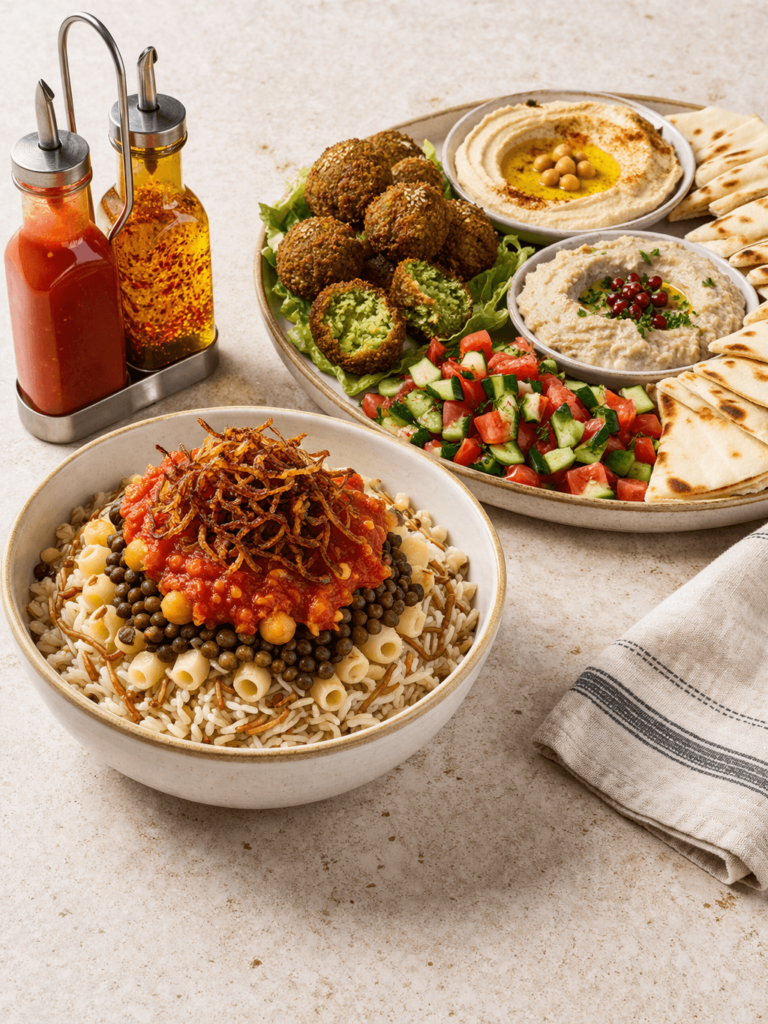
- Layer in a bowl: rice with vermicelli, followed by pasta, then lentils ( you can swap pasta and lentils if you prefer), and finally the Chickpeas. Top the dish with the tomato sauce, and Crispy fried onions on top.
- Serve hot, with the shatta (spicy hot sauce) and da'a (garlic and vinegar sauce) in small bowls or glass bottles on the side for guests to add as they like.
Video
Tips for the Best Koshari
- Keeping rice, lentils, and pasta separate prevents mushiness and gives the perfect layered texture and authentic flavor.
- Let the vermicelli turn a deep golden brown (not just light). This adds a rich, nutty flavor to the rice.
- Don’t overcook lentils. They should be tender but still hold their shape—not mushy.
- Salt every layer. Season rice, lentils, pasta, chickpeas, and sauce individually for bold, balanced flavor throughout the dish.
- Koshari sauce should be slightly tangy and garlicky—don’t skip the garlic & vinegar sauce or hot sauce for that authentic kick.
- Crispy onions are a star topping. Go for deep golden brown for maximum crunch and flavor (but avoid burning).
- Mixing ditalini pasta with angel hair gives the dish its signature texture contrast.
- Koshari tastes best fresh, while the onions are still crispy and the layers are warm.
How to store Koshari
If you have leftovers, they’ll keep beautifully in an airtight container in the refrigerator for up to four days. To keep the onions perfectly crunchy, store them in a separate sealed container at room temperature—they’ll stay fresh for a full week.
When you’re ready for more, gently microwave the grains and legume while heating the tomato sauce on the stove until it bubbles (add a tiny bit of water if it seems too thick). Serve the garlic & vinegar and spicy hot sauces cold or at room temperature for the most authentic experience.
What to serve with the Authentic Egyptian Koshari
Koshari is a traditional Egyptian complete meal dish. You can simply serve it with Pickled vegetables (torshi), spicy hot sauce (shata), and garlic & vinegar sauce (da’a).
You can also add a platter of Hummus, Baba ganoush, Falafel, and cucumber tomato salad or tabouli, along with warm pita bread for a complete Middle Eastern table.
If you try this authentic Egyptian koshari recipe, I’d love to hear how it turned out for you. Leave a comment below and let me know what you served it with or how you made it your own. Don’t forget to save this recipe for later and share it with family and friends who enjoy easy, delicious Mediterranean meals!
More Recipes to Try
- How to Make Authentic Kebda Eskandarani (Egyptian Alexandrian Beef Liver)
- Vegan Date Filled Pinwheel Cookies (Soft Sesame Swirl Cookies)

- Vegan Crispy Cauliflower Recipe – Perfectly Crunchy & Easy to Make

- Authentic Egyptian Betefour Cookies Recipe

- Authentic Egyptian Koshari Recipe (Easy Homemade Street Food Classic)
- Easy Shrimp Scampi Pasta with Lemon Garlic Butter Sauce